Testing CUDA for vanity public key tokens
| 1589 words | 8 minutes
Intro
One way strong-name signing of C# assemblies is exposed to a developer is through a public key token, for example, b03f5f7f11d50a3a. Given that strong names are not supposed to be used for security and since it’s only 8 bytes, I wondered how hard would it be to generate a public key that would have a vanity token – a token with specific 8 bytes. I’ve also never used CUDA for anything before, so I figured this would be also interesting practical issue to attempt to apply CUDA to.
In essence, we’re looking for a partial hash collision. By default, strong-name signing works with RSA-1024 keys and SHA1 hashes [1]. The token is computed by hashing 32 bytes of key’s metadata and 128 bytes of key’s modulus, and only returning the last 8 bytes of the hash [2]. So, to create a vanity token, the simplest brute-force algorithm would be to loop through the following steps, until wanted token is found.
- Generate an RSA-1024 key pair.
- Compute public key token.
- Compare token with the expected token.
Since both the theoretical and practical parts are quite new to me, I figured that I’ll need some intermediate milestones. Generating valid RSA keys requires a lot more effort, so for the moment, the algorithm can be reduced to simply generate random 128 bytes. This will allow me to focus more on learning SHA1 and CUDA parts of this project.
Figuring out CUDA APIs
It was easy enough to find a lot of tutorials and university course slides on the topic, to get the grasp of basic ideas and relevant APIs. At the same time I read through “Professional Cuda C Programming” [3]. However, getting through the next steps wasn’t trivial for me. Many tutorials focus on using the “raw” CUDA APIs. But then, there’s “standard” libraries, combined under NVIDIA/cccl, which seemingly provide much easier API, but these are rarely seen in the “wild”. Obviously, this is very anecdotal, but it would’ve been nice to find “here’s thrust::device_vector, it’s std::vector, but on device” much sooner.
Compare this:
| |
And the same thing with thrust vectors, which have interface similar to std::vector:
| |
In addition, libcudacxx saved a lot of time for me, after I found out about it. I was writing the code and testing it on both the device and the host, so there was couple of options for function signatures/implementations: either no-std way with raw pointers used by both host and device callers, or duplicates with nice C++ API for host callers and no-std variants for device callers.
| |
Neither of these sounded great, especially for this learning/hobby project, so I was greatly relieved when libcudacxx came and essentially told that “hey, you have that C++ code? replace std with cuda::std and you’re done!”. Now, the exact same code was usable from both the device and the host.
| |
Figuring out CUDA tooling
Similarly to different APIs, there were also older and newer supporting tools. nvprof (NVIDIA Visual Profiler) is a legacy tool and is replaced by ncu (Nsight Compute) [4]. What makes it somewhat confusing is that ncu doesn’t really work out-of-box on my Ubuntu 22.04. As far as I can tell, there’s two separate issues [5] [6], and the tool should be executed as follows:
| |
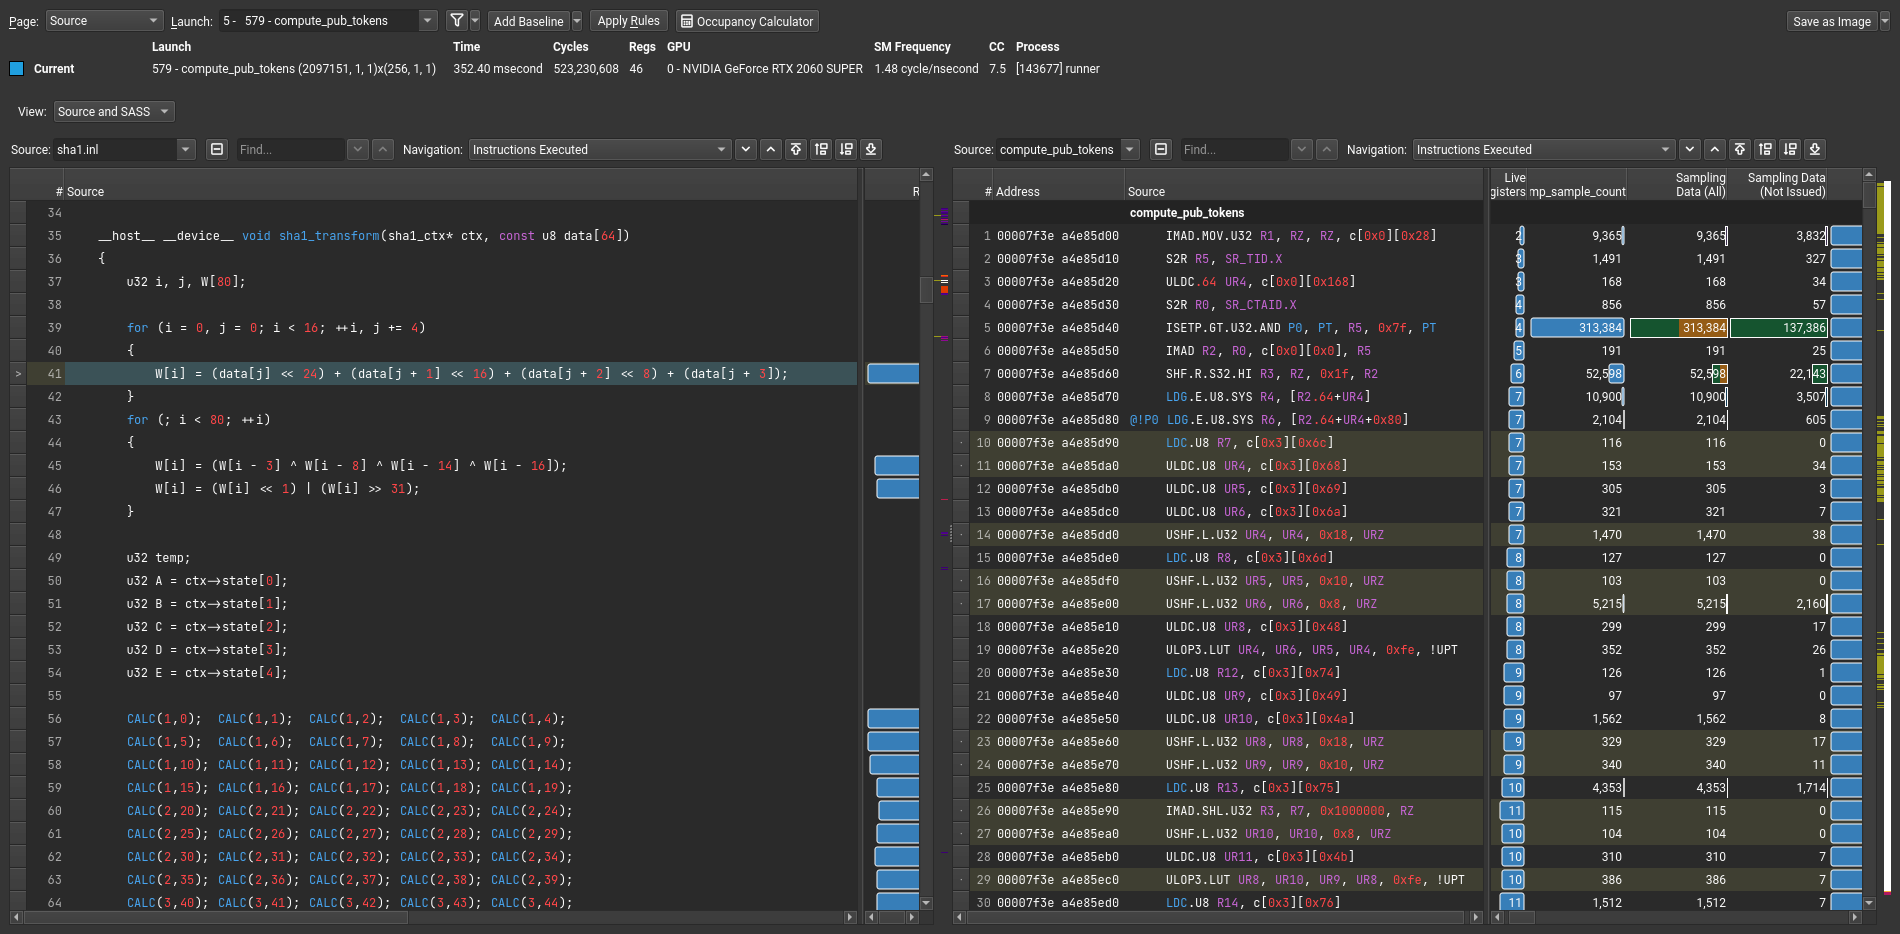
Similarly, ncu-ui complains about incompatible Qt library when launching, which I fixed that with instructions from [7]. The UI can show SASS code with relevant profiling data. In order to see which instructions were generated from which part of the code, nvcc needs to be supplied with -lineinfo argument.
After all of this, I was able to capture profiler output and view it inside the ncu-ui. Following image shows CUDA source code included on the left side and SASS code on the right side, with matching lines highlighted.
Experiments
Before moving to CUDA experiments, the first baseline version was created using C++ code. Reminder, in all of these experiments I’m not generating RSA keys yet, the moduli used for calculations are simply random bytes. The baseline version runs through different moduli at speed of 0.8 million entries per second (M/sec).
The first GPU version is a relatively straightforward translation of C++ code to CUDA, using libcudacxx. This version generates ~500 million random bytes and computes tokens from each 128 byte span and is able to do that at 50 M/sec. This was a nice surprise! I’m clearly not doing anything too specialized yet, but simply using different standard library, compiler, and execution environment, allowed the same code to execute 50 times faster.
Since we’re dealing with random bytes, the first obvious improvement on this was to slide the evaluation window by 1 byte increments each time. Thus, for example, a span of 256 bytes would produce 255 tokens instead of only 2. This allows us to re-use as much data as possible from single RNG output. This version was able to run at 260 M/sec.
When starting working with CUDA code in this project, I found that it compiled relatively slowly. I learned later that it’s because we’re essentially running two compilers sequentially, instead of only one. But for that moment, I generously used headers to reduce re-compilations triggered by main.cu. However, the more the compiler is able to see, the more it’s able to optimize. So, to try out how much this affects the end result, I went back and inlined all the things. This bumped the speed to 380-400 M/sec.
Until this point, I was working with a SHA1 implementation that was generalized to take input of any length. For example, after the input is processed, the algorithm checks how full its internal buffer is and pads it, when necessary. It also appends message’s length, which it keeps track of during processing. You can imagine that that’s a lot of unnecessary conditionals and extra SASS instructions to get the exact same end result for each modulus.
Thus, the next experiment was to pre-compute as much as possible, so that the only variable that would be left would be the input modulus itself. The first 32 bytes are public key metadata, next 128 bytes are for the modulus, and then the SHA1 finalization uses 32 bytes for the padding and message lengths. So, the whole 192 byte message is hashed in 3 batches of 64 bytes. This removes a lot of conditional code and achieves 1560 M/sec speed!
Finally, I experimented with __shared__ memory a little bit. The way I understand this, each thread in a block could read whole 128 bytes they need one value at a time, or they could copy different bytes into shared memory at the same time. Given 128 threads, this means 128 operations to read from global memory versus 1 operation to read from global into shared. Even though it sounds like it would help a lot, the improvements were relatively small – 1580 M/sec. Maybe, because the solution just reads the input bytes sequentially, there’s some other caching that handles this use-case well enough, without the need for explicit __shared__ block.
Note, while writing previous numbers down, I went back to different commits to ensure that they still match. For some of these, I saw quite drastic changes compared to ones I documented in the commits, and I’m not sure what’s behind such change. For example, the latest version was 1260 M/sec when I committed the changes, but currently it clocks around 1560-1600 M/sec. I can believe that changes in 10’s of millions might be caused by the system itself being under different loads at different times, but change of 100’s millions I cannot explain. I guess it’s a good thing that it updated into positive direction.
Results
| Experiment | Speed |
|---|---|
| CPU, baseline | 0.8 M/s |
| GPU, initial | 50 M/s |
| GPU, sliding window | 260 M/s |
| GPU, header-only | 380 M/s |
| GPU, pre-computed SHA1 | 1560 M/s |
| GPU, shared memory | 1580 M/s |
All around, the latest GPU version is three orders of magnitude faster (approx. 2000x) than trivial CPU version. Also, ncu-ui tells me that “Compute Throughput” is 95% for the latest version, so I guess I’m utilizing the resources I have as well as I can for now. These are pretty motivating results for a first CUDA project!
Now, speed is nice, but does the application even work? Well, yes, potentially. I set to find the random bytes that would produce f01dab1ef0cacc1a token (“foldable focaccia”). So far, I’ve run the application for 12 hours and the best it could find was a 5 byte collision with a token of 9b7ca91ef0cacc1a. Given that I’m still generating only random bytes and not proper RSA keys, I’m not so keen on wasting computation time. But I guess the results tell that given enough time, it could find a full collision. The next step for this project would be to actually generate RSA keys to use for token computation.